My son just celebrated his first birthday. While kicking around on Pinterest some time ago, I really fell in love with the monster parties I encountered. So, monsters became the inspiration behind this party. Let me share!
Goodie Bags-
There aren't many young children in our family so the goodie bags were rather easy to assemble. Because I despise little junk, I tried to add things which would be fun but would not be trampled under foot once taken home.
I purchased the Cookie Monster bags from the dollar bins at Target, along with the Cookie Monster notepad and monster water bottle. The little "paint a car" and "make a monster mask" crafts were purchased from a clearance end cap at Target. The bubbles came from Wal-Mart.
I also made a coloring book from monster clip art I found on Google Images. I added simple sentences to each page since many of our young guests are just beginning to read... or will soon be learning how. I purchased Crayola crayons during the back to school sales.
(Monster image from: http://www.graphicsfactory.com/Clip_Art/Cartoon/0799-Happy-Green-Monster-Celebrates-Birthday-With-Cake_377915.html)
Decorations-
Because I had to prepare everything at home then travel 3 1/2 hours for the actual party, I made sure everything could go up and be taken down easily and in a short period of time. I knew I wanted to feature bright colors and keep the decorations simple. I decided to make monster faces and have each feature a different photo of my son throughout his first year of life.
It turned out to be a GREAT idea!
I traced a form onto colored cardstock then proceeded to cut out each face. I embellished each monster with googly eyes, teeth cut from white cardstock and a photo of my son printed out from a color printer and cut into an open mouth shape. What a job!! I was careful to feature a photo of each guest so everyone would have fun remembering special moments with my son. Monsters were displayed from clothespins attached to jute cord. The cord was draped along the walls at the party. Everyone loved the visual experience of seeing my son grow from one picture to the next. When the party was over, I carefully took the monsters down, placed them into gallon-sized Ziploc bags and will save them for his 16th or 18th birthday. :-)
Cake-
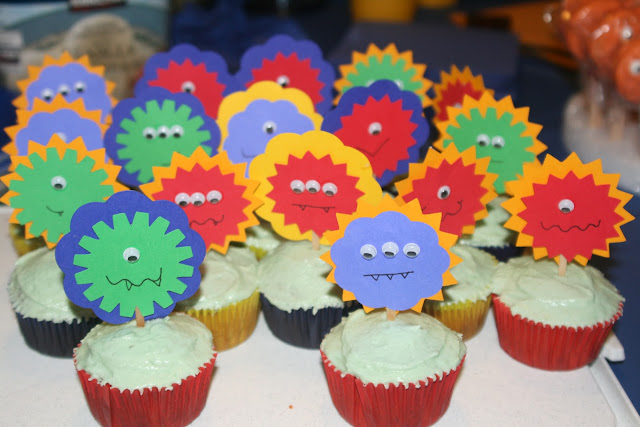
For my children's first birthday parties, I am sure to include an option which doesn't stain. I am not a fan of having to clean greasy red frosting out of a light colored shirt or digging dark chocolate cake out of little ears and hair. I prepared banana cupcakes with banana frosting (his great grandmother's recipe). I tinted the frosting a light green to add a little color but ensure my little guy wouldn't need a bath half-way through the event. To make the cupcakes more thematic, I fashioned cupcake picks from cardstock, googly eyes, a wooden sandwich pick and a little hot glue. I added the mouths with a fine Sharpie.
I really loved all of their expressions. It was also difficult to decide if I liked one, two or three eyes best!
Here is the recipe for the Banana Cake with Banana Frosting...
Cake:
1 1/2 cup sugar
1/2 cup butter
2 eggs
2 cups flour
1 tsp baking powder
1 tsp baking soda
1/2 tsp salt
3/4 cup milk
1 cup mashed ripe bananas
1 tsp vanilla
1 cup chopped walnuts (optional)
Frosting:
1 pound powdered sugar (about 3 cups)
1 stick softened butter
1 mashed ripe banana
1 cup chopped walnuts (optional)
Grease and flour cakepans. Mix ingredients and beat with an electric mixer on high. Bake at 350 degrees 35 - 40 minutes. Let cool 10 minutes in pan then cool completely on a rack. Prepare frosting by blending the first three ingredients, then stir in half of the nuts. Spread onto cooled cake and garnish with remaining nuts.
Game-
I made the conscious choice not to produce any elaborate party games. Why? Because my son is just one and I did not want to pack anything else into the car for the long trip. I did, however, produce a Monster Quiz from questions I gathered from various websites (Site 1, Site 2, Site3). Each guest got one double-sided quiz, a pencil and 10 minutes. At the end of that time, everyone corrected their own papers. I was impressed with their monster knowledge! My parents did well but my grandma whipped them both. We had three tied for second place!! Winners received a $5 gift card to that famous coffee house with the mermaid logo.
(monster image from: http://storybird.com/aaronblecha/artwork/tuba-monster/)
Favors-
In a previous post, I shared how I fashioned the party favors - Monster Oreo Pops. They took a little time to prepare but were not difficult. They were a BIG hit with the guests. I also added little tags which thanked the guests for sharing in the celebration. I took the extras to work where they were promptly consumed so I would not be tempted.
(Monster image from http://feetintwoworlds.wordpress.com/2012/02/22/counselor-self-care-battling-the-insomnia-monster/)
Happy birthday, little man! We love you!!!


